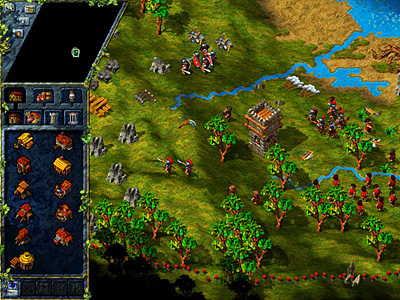
The main screen
![]()
![]()
![]() In the overview map you can survey the area that you've explored and
the area opened up by the construction and location of your Settlers. The three small
buttons to the left of the overview map focus on each of these points. You'll see a
white-bordered rectangle in the overview map; this represents the playing area currently
displayed on your screen. With a left mouse click on the overview map, you can jump from
the current playing area to the place where you've clicked in the overview map.
In the overview map you can survey the area that you've explored and
the area opened up by the construction and location of your Settlers. The three small
buttons to the left of the overview map focus on each of these points. You'll see a
white-bordered rectangle in the overview map; this represents the playing area currently
displayed on your screen. With a left mouse click on the overview map, you can jump from
the current playing area to the place where you've clicked in the overview map.
![]() With the "Chat" Button in the upper left you can write messages.
Press the return key, type in your message, and press the return key once again to send it
off. In a multiplayer game you can also decide who receives your messages. This is a nice
feature when you don't want to share information with your opponents.
With the "Chat" Button in the upper left you can write messages.
Press the return key, type in your message, and press the return key once again to send it
off. In a multiplayer game you can also decide who receives your messages. This is a nice
feature when you don't want to share information with your opponents.
![]() With the
"Territory Display" button at the very top you can toggle the display for the
With the
"Territory Display" button at the very top you can toggle the display for the
![]() colors of the visible players
colors of the visible players
![]() simple map mode, which distinguishes only between land and sea
simple map mode, which distinguishes only between land and sea
![]() topographical map mode, in which mountains, swamps and other
features of the map are displayed.
topographical map mode, in which mountains, swamps and other
features of the map are displayed.
![]() With the
"Settlers Display" button you can toggle the display between
With the
"Settlers Display" button you can toggle the display between
![]() only military personnel
only military personnel
![]() all of your Settlers
all of your Settlers
![]() no Settlers
no Settlers
![]() With the
"Building Display" button you can choose whether you want to have your buildings
displayed or not.
With the
"Building Display" button you can choose whether you want to have your buildings
displayed or not.
 Below the overview map you'll find the Control
Center. Selecting one of these three main button will take to either the Buildings
menu, the Goods menu or the Settlers menu.
Below the overview map you'll find the Control
Center. Selecting one of these three main button will take to either the Buildings
menu, the Goods menu or the Settlers menu.
![]() When you press the button for the Buildings menu,
four more buttons will appear directly below the three main buttons. From left to right
these represent the buildings for Resources, Food, Military and Miscellaneous.
When you press the button for the Buildings menu,
four more buttons will appear directly below the three main buttons. From left to right
these represent the buildings for Resources, Food, Military and Miscellaneous.
![]() In this menu you'll find the huts for the
woodcutter and stonecutter, the mines and smelting works, as well as the tool smith's
works. You can find more information on these buildings in the chapter on the economy.
In this menu you'll find the huts for the
woodcutter and stonecutter, the mines and smelting works, as well as the tool smith's
works. You can find more information on these buildings in the chapter on the economy.
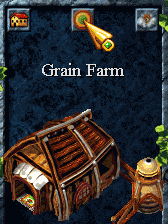
![]() In this menu you'll find all the buildings you
need to feed your mineworkers, from farms and mills to bakeries, waterworks and
slaughterhouses. You can find more information on these buildings in the chapter on the
economy.
In this menu you'll find all the buildings you
need to feed your mineworkers, from farms and mills to bakeries, waterworks and
slaughterhouses. You can find more information on these buildings in the chapter on the
economy.
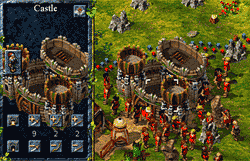
![]() A complete arsenal of buildings is available to
you for your military needs. These include barracks, the weapon smith's works, castles and
various towers. You can find more information on these buildings in the chapter on the
military.
A complete arsenal of buildings is available to
you for your military needs. These include barracks, the weapon smith's works, castles and
various towers. You can find more information on these buildings in the chapter on the
military.
![]() Here you'll find the religious and residential
buildings, the storage area, the market place and landing dock. Without these buildings
the Settlers would be hard-pressed to survive. You can find more information on these
buildings in the chapter on the economy.
Here you'll find the religious and residential
buildings, the storage area, the market place and landing dock. Without these buildings
the Settlers would be hard-pressed to survive. You can find more information on these
buildings in the chapter on the economy.
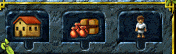
![]() Everything that you have to know about goods and
how you can adjust priorities for their transport or distribution can be altered in this
menu.
Everything that you have to know about goods and
how you can adjust priorities for their transport or distribution can be altered in this
menu.
![]() It is always important to know when supply is not
meeting demand, or when production is overflowing and wasting resources. In this
menu you can find what resources and supplies you need, as well as those that you have in
abundance.
It is always important to know when supply is not
meeting demand, or when production is overflowing and wasting resources. In this
menu you can find what resources and supplies you need, as well as those that you have in
abundance.
![]() Normally the production of weapons and tools runs
automatically. When you look in this menu you'll find a row of symbols which represent the
tools and weapons of the Settler world. Of course, without heavy industry, no tools or
weapons will be produced.
Normally the production of weapons and tools runs
automatically. When you look in this menu you'll find a row of symbols which represent the
tools and weapons of the Settler world. Of course, without heavy industry, no tools or
weapons will be produced.
![]() To the right you'll see a row of numbers and a bit
farther to the right a row of arrow buttons. With these buttons you can control which tool
or weapon is to be produced next. When you click on the up button to the right of the axe,
the zero will change into a one. Your tool smith will now produce a axe next.
To the right you'll see a row of numbers and a bit
farther to the right a row of arrow buttons. With these buttons you can control which tool
or weapon is to be produced next. When you click on the up button to the right of the axe,
the zero will change into a one. Your tool smith will now produce a axe next.
The tools and weapons are produced from top to bottom. If you first need a couple of axes and then a couple of hammers, you should set production for the axes first and only after they have been produced, should you set the production for the hammers. Otherwise, the hammers will be produced first because they occupy a higher position in the list. The same applies for weapons. If you need bows first and then swords, you should set production for the bows first and only after they have been produced, should you set production for the swords.
This list determines your urgent production needs. As long as a tool or weapon is entered for urgent production, your tool or weapon smith will ignore the general production priorities.
![]() The blue bars to the right of the arrow buttons show the relative
priority of the tools to be built. The priorities can be changed by clicking directly
within the bars. The farther the blue bar extends to the right, the more often your tool
or weapon smith will produce the corresponding tool.
The blue bars to the right of the arrow buttons show the relative
priority of the tools to be built. The priorities can be changed by clicking directly
within the bars. The farther the blue bar extends to the right, the more often your tool
or weapon smith will produce the corresponding tool.
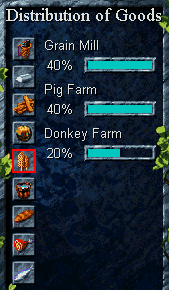 The same kinds of goods may be needed in different buildings. For
example, your weapons smith urgently needs coal but your carriers give the tool smith
priority. This dilemma can be fixed by altering the settings within the "Goods"
menu. All buildings that are in line to receive this good will appear in the menu. The
blue bars show the current priority each building has for the particular good in question.
By left-clicking the bar, you can increase or decrease the percentage of this good going
to each of the buildings.
The same kinds of goods may be needed in different buildings. For
example, your weapons smith urgently needs coal but your carriers give the tool smith
priority. This dilemma can be fixed by altering the settings within the "Goods"
menu. All buildings that are in line to receive this good will appear in the menu. The
blue bars show the current priority each building has for the particular good in question.
By left-clicking the bar, you can increase or decrease the percentage of this good going
to each of the buildings.
![]() In this menu you can determine which goods have
the higher transportation priority and which ones are to be stored in the storage area.
The first thing that you'll notice when you see this menu is the snakelike chain of
symbols representing the various goods. Below, you'll see six additional buttons. Their
functions, from left to right are: store, don't store, highest priority, increase
priority, decrease priority, and lowest priority.
In this menu you can determine which goods have
the higher transportation priority and which ones are to be stored in the storage area.
The first thing that you'll notice when you see this menu is the snakelike chain of
symbols representing the various goods. Below, you'll see six additional buttons. Their
functions, from left to right are: store, don't store, highest priority, increase
priority, decrease priority, and lowest priority.
![]()
![]() Take note that all the symbols of the goods have
either a red or green dot. These dots indicate whether the corresponding goods can be
brought to the storage area or not. With the "Store" or "Don't store"
buttons, you can change the status for whichever goods you want. The priority with which a
good is transported is reflected in its position in the chain. The higher the position of
the good, the higher its priority.
Take note that all the symbols of the goods have
either a red or green dot. These dots indicate whether the corresponding goods can be
brought to the storage area or not. With the "Store" or "Don't store"
buttons, you can change the status for whichever goods you want. The priority with which a
good is transported is reflected in its position in the chain. The higher the position of
the good, the higher its priority.
![]()
![]()
![]()
![]() If you want to change the priority with which a
good is transported, you can select the corresponding symbol with a mouse click and make
the changes with the help of the arrow buttons.
If you want to change the priority with which a
good is transported, you can select the corresponding symbol with a mouse click and make
the changes with the help of the arrow buttons.
![]() Everything that you have to know about your
Settlers, you can learn here. And, naturally, you can also make fine adjustments on your
population here.
Everything that you have to know about your
Settlers, you can learn here. And, naturally, you can also make fine adjustments on your
population here.
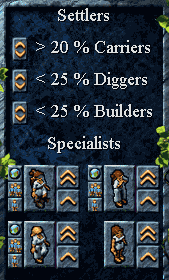
![]() How many Settlers do you actually have? How many
of them are carriers? In this menu you can find out how many diggers, builders, swordsmen,
spearmen, bowmen, thieves, pioneers and geologists you have.
How many Settlers do you actually have? How many
of them are carriers? In this menu you can find out how many diggers, builders, swordsmen,
spearmen, bowmen, thieves, pioneers and geologists you have.
![]() In the "Occupations" menu you can adjust
the maximum percentage of Settlers who work as diggers and builders, as well as the
minimum percentage who function as carriers. Here you can also recruit your specialists:
In the "Occupations" menu you can adjust
the maximum percentage of Settlers who work as diggers and builders, as well as the
minimum percentage who function as carriers. Here you can also recruit your specialists:
![]() above left: Geologists (changes carriers to geologists)
above left: Geologists (changes carriers to geologists)
![]() above right: Pioneers (changes carriers to pioneers)
above right: Pioneers (changes carriers to pioneers)
![]() below left: Thieves (changes carriers to thieves)
below left: Thieves (changes carriers to thieves)
![]() below right: Carriers (changes pioneers back to carriers)
below right: Carriers (changes pioneers back to carriers)
To recruit your specialists, please click on one of the
arrow symbols to the right of the specialist. The double arrow symbol converts five
settlers, the single arrow symbol converts only one settler. Of course, you can only
convert carriers into specialists when carriers are available. If you need more carriers,
you must build a residence. Make sure that carriers are visible in the playing area when
you convert them to specialists.
![]() The three small buttons to the left of each of the specialists
allows you (from top to bottom)
The three small buttons to the left of each of the specialists
allows you (from top to bottom)
![]() to select either all of your specialists of this kind,
to select either all of your specialists of this kind,
![]() all of your specialists of this kind in the currently viewable
playing area or
all of your specialists of this kind in the currently viewable
playing area or
![]() just one of the specialists of this kind.
just one of the specialists of this kind.
For more information on the tasks of your specialists, please look at the section "The Economy / Occupations".
.
![]() Provided that you have some unemployed Settlers, a
barracks and the infrastructure for producing weapons, then you can recruit soldiers from
this menu.
Provided that you have some unemployed Settlers, a
barracks and the infrastructure for producing weapons, then you can recruit soldiers from
this menu.
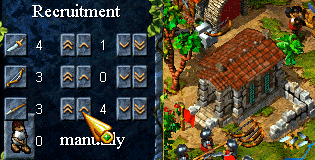 The numbers adjacent to the weapon symbols
indicate how many weapons are available in the barracks. With the arrow buttons you can
set how many soldiers you want to recruit.
The numbers adjacent to the weapon symbols
indicate how many weapons are available in the barracks. With the arrow buttons you can
set how many soldiers you want to recruit.
By collecting a weapon from the barracks, your Settler becomes a soldier. With the "Manual / Automatic" toggle switch you can ensure that every weapon delivered to the barracks is immediately assigned to a Settler. The number to the right of this toggle switch lets you know how many Settlers can be recruited at present.
In this menu you can also promote your soldiers. You can find out how to do this in the chapter on the military under "Basics" and then "How to Promote Soldiers".
![]() Here you'll find all the important information you need concerning
production. You can quickly analyze which goods you have in abundance and where you may
have shortages.
Here you'll find all the important information you need concerning
production. You can quickly analyze which goods you have in abundance and where you may
have shortages.
The menu for divine intervention was previously in this place. This menu can now be opened by selecting one of your priests.
![]() Here you can save your
games. Please keep in mind, though, due to the large amount of information, this could
take up several megabytes of space on your hard drive. Here you can also end your game.
Here you can save your
games. Please keep in mind, though, due to the large amount of information, this could
take up several megabytes of space on your hard drive. Here you can also end your game.
![]() Here you'll be given general information about the
game and some hints and tips as well. When you are missing a tool or don't have enough
Settlers, this button will blink and then give you information about the problem after you
click on it.
Here you'll be given general information about the
game and some hints and tips as well. When you are missing a tool or don't have enough
Settlers, this button will blink and then give you information about the problem after you
click on it.
Here again, as with the other messages, your view of the
playing area will shift to appropriate area of the map where you can assess the situation
and take action if necessary. By clicking on the small arrow in the window (see the
picture on the right), you'll return to the area of the map hwere you originally were.
Military Information
![]()
![]() Here you'll be given
information dealing with military matters. The most important of these tell you when you
are under attack, when you've captured an enemy tower, and when one of your towers has
been captured
Here you'll be given
information dealing with military matters. The most important of these tell you when you
are under attack, when you've captured an enemy tower, and when one of your towers has
been captured
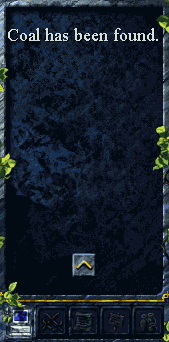
![]() Here you'll be given
information about mineral deposits that your geologist has discovered. Here you'll also be
informed of attractive locations for building the various mines that your race can build.
Here you'll be given
information about mineral deposits that your geologist has discovered. Here you'll also be
informed of attractive locations for building the various mines that your race can build.
![]() Here you'll find information
which has to do with your trade routes. You'll be alerted here if one of your trade routes
is under attack.
Here you'll find information
which has to do with your trade routes. You'll be alerted here if one of your trade routes
is under attack.
Even if it appears at the moment otherwise, the majority of your actions will be directed in the playing area. Here you give commands such as to build and tear down buildings, and to attack. You'll soon learn how you can direct the Settlers and the activities of the buildings in the playing area.
Selecting
Settlers or Buildings
![]()
 In order to select a Settler or a building, you
simply have to click on the character or building with your left mouse button or wrap it
by holding the left mouse button down while moving the mouse so that you "draw"
a rectangle around it.
In order to select a Settler or a building, you
simply have to click on the character or building with your left mouse button or wrap it
by holding the left mouse button down while moving the mouse so that you "draw"
a rectangle around it.
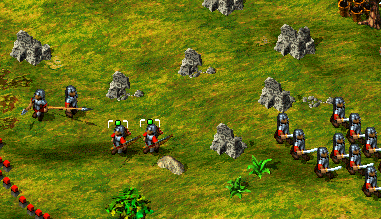
Wrapping allows you to select, for example, several soldiers at once. There are many ways to join soldiers into groups and to select them as groups. Details about doing this will be provided below.
In order to deselect buildings or Settlers, simply click with your left mouse button anywhere in the playing area.
Directing
Soldiers and other Settlers
![]()
You can move soldiers you've selected by clicking with your right mouse button on the position in the playing area where you want to send them. If you've adjusted the scrolling in such a way that you have to hold the right mouse button depressed to move to this position, the program will interpret this correctly. The move command will only be effected with a short mouse click. Therefore you can scroll from side to side and up and down before you give the move command.
It is also possible to give a move command by right-clicking on a position on the overview map.
There are some further useful keyboard commands and options for selecting.
Adding Soldiers to already existing
Groups
![]()
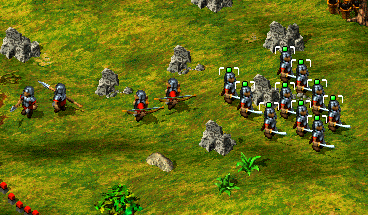
If you've already selected a group of soldiers, you can add still more soldiers to this group by selecting them with the SHIFT key held down.
Selecting
only one Type of Soldier
![]()
 If you want to select only one type of soldiers
from a larger group of soldiers in the playing area, you can do this by marking one
single bowman, for example, at the same time holding down the ALT-key.
This will select all the bowmen in a broad area.
If you want to select only one type of soldiers
from a larger group of soldiers in the playing area, you can do this by marking one
single bowman, for example, at the same time holding down the ALT-key.
This will select all the bowmen in a broad area.
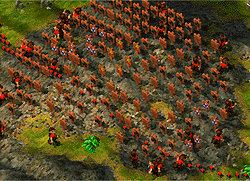
Combining
Soldiers into Groups
![]()
You can combine as many groups of soldiers as you want into designated combat units by selecting all the members of this group and then while holding down the ALT-key, by entering a number from one to nine.
 The combat unit designated in this way can then
be selected and directed by a single stroke on the corresponding number. A second stroke
of this number centers the screen on this designated group. This helps you to move your
troops into battle with more flexibility and precision.
The combat unit designated in this way can then
be selected and directed by a single stroke on the corresponding number. A second stroke
of this number centers the screen on this designated group. This helps you to move your
troops into battle with more flexibility and precision.
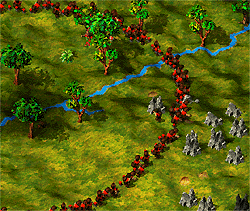
If you give a normal move command, the soldier can be distracted on his way by enemies. This is annoying if this soldier is wounded and you want him to go direct to the healer. If you give the move command by pressing the right mouse button and at the same time the CTRL-key, the soldier will ignore all distractions and go direct to the position you've chosen.
In addition to your ultimate point of destination, you can also set several waypoints which your soldiers advance to on their way to their final destination. You can set the waypoints (a maximum of three plus the final destination) by clicking with your right mouse button in the desired sequence on the playing area and at the same time holding down the SHIFT-key.
A good way for making it difficult for thieves to infiltrate your colony is by making use of patrols. Create a small group and click with your right mouse button while holding down the ALT-key to choose the "turning point" of your patrol. Your group of soldiers will immediately begin patrolling between the present position and the one you've just chosen.
All move commands can be cancelled by giving any other move command you want.
 Select a geologist with a left click and move him
by right clicking on the desired destination, somewhere in the mountains where he can
search for minerals. He'll immediately move to the desired location. In order to get him
to examine the earth for minerals, click with your right mouse button while holding down
the ALT-key. Your geologist will begin investigating the land in the
surroundings for deposits of gold, coal, iron ore, jewels and sulfur.
Select a geologist with a left click and move him
by right clicking on the desired destination, somewhere in the mountains where he can
search for minerals. He'll immediately move to the desired location. In order to get him
to examine the earth for minerals, click with your right mouse button while holding down
the ALT-key. Your geologist will begin investigating the land in the
surroundings for deposits of gold, coal, iron ore, jewels and sulfur.
You can also have your geologist begin searching for minerals by selecting him and then clicking on "Find resources".
To your opponent(s) your thieves look like carriers, unless the thief comes too near an enemy soldier. If this happens your thief will lose his cover and the enemy soldier will begin pursuit.
You commission a thief by selecting him and sending him on his mission with a right mouse click. To have your thief begin pilfering goods for you, select him, then right-click on him while holding down the ALT-key.
Your thief can not only pilfer goods from your enemy but also scouts the enemy colony for you. Take good care of him. He deserves your attention.
Unfortunately, thieves are rather slow when carrying back their stolen wares and are therefore an easy target for soldiers pursuing them. Make sure that you don't let your thieves roam too far from your borders and that you have some soldiers to protect them when they are fleeing from enemy soldiers.
 The pioneer is a Settler who can expand your
colony. He can either do this along your present borders or he can also take possession of
territory for you in more distant areas. He does this by sinking posts which redefine your
new borders. He can do this everywhere except in enemy territory currently protected by a
guard tower or castle. To commission your pioneer, simply select him and send him to his
new working area with a right mouse click. To have your pioneer begin annexing territory
for you, select him, then right-click on him while holding down the ALT-key.
The pioneer is a Settler who can expand your
colony. He can either do this along your present borders or he can also take possession of
territory for you in more distant areas. He does this by sinking posts which redefine your
new borders. He can do this everywhere except in enemy territory currently protected by a
guard tower or castle. To commission your pioneer, simply select him and send him to his
new working area with a right mouse click. To have your pioneer begin annexing territory
for you, select him, then right-click on him while holding down the ALT-key.
Pioneers are invaluable in bringing distant territory under your control especially islands and land rich in resources. Before you can bring your workers there and construct any building whatsoever, you must have a bit of your own territory there. You'll find more information about starting a second colony in the section "Trade / Transport / Second Colonies".
Civilian buildings are all buildings except castles, guard towers and lookout towers. Barracks are to be construed here as civilian buildings. Buildings are selected in the same way as Settlers.
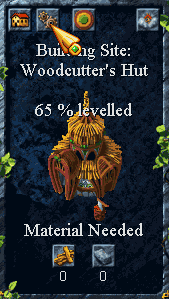
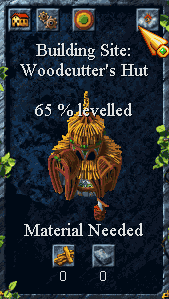
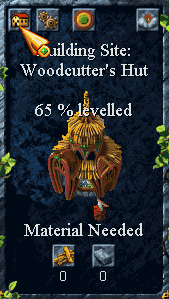 Sometimes in the heat of battle there are so many buildings under
construction that there can be supply problems. It is advisable in these cases to give the
urgently needed buildings priority. This can be done by stopping construction on less
important buildings. To do this you must first select the building under construction. A
"Building" menu will appear on your left. In the upper left you'll see a button
with a small house. By clicking on this button, construction on this building will be
suspended and you'll notice the button now shows an open hand.
Sometimes in the heat of battle there are so many buildings under
construction that there can be supply problems. It is advisable in these cases to give the
urgently needed buildings priority. This can be done by stopping construction on less
important buildings. To do this you must first select the building under construction. A
"Building" menu will appear on your left. In the upper left you'll see a button
with a small house. By clicking on this button, construction on this building will be
suspended and you'll notice the button now shows an open hand.
In order to resume construction, you simply have to
reselect the building and click on the button with the open hand.
Giving
a Construction Site Priority
![]()
 It is possible that you begin construction on several buildings and
then notice that in order to get them all finished in a reasonable amount of time, you
need more Settlers. Unfortunately, you haven't begun construction on a residence. You
could, of course, suspend work on each of the buildings under construction and begin with
the residence. A more convenient alternative is available. Simply begin with the
construction of the residence in the normal way. Click on the construction site and in the
menu which appears on the left, click on the button with the interlocking gears. This
construction site has now received highest priority. The button with the interlocking
gears will now have a exclamation point on it. It will be the first to be cleared and
leveled by the diggers, the first to receive building materials and the first built. Soon
you'll have enough Settlers to finish construction on the remaining buildings.
It is possible that you begin construction on several buildings and
then notice that in order to get them all finished in a reasonable amount of time, you
need more Settlers. Unfortunately, you haven't begun construction on a residence. You
could, of course, suspend work on each of the buildings under construction and begin with
the residence. A more convenient alternative is available. Simply begin with the
construction of the residence in the normal way. Click on the construction site and in the
menu which appears on the left, click on the button with the interlocking gears. This
construction site has now received highest priority. The button with the interlocking
gears will now have a exclamation point on it. It will be the first to be cleared and
leveled by the diggers, the first to receive building materials and the first built. Soon
you'll have enough Settlers to finish construction on the remaining buildings.
If you give priority to several building sites, the last
one chosen will be given the highest priority.
 After you have begun construction on a new building, you may
determine that were a bit hasty and the building is either unnecessary or should be
located elsewhere. In this case it could be a good idea to tear the building (or
construction site) down.
After you have begun construction on a new building, you may
determine that were a bit hasty and the building is either unnecessary or should be
located elsewhere. In this case it could be a good idea to tear the building (or
construction site) down.
Select the building or site and in the "Building" menu on your left, then click on the button with the cloud of dust. For safety's sake, you'll be asked to confirm that you really want to demolish the building or site. Answer with "Yes" and you'll see why the button shows a cloud of dust.
WARNING: You'll only be able to recover
half of the material already used in construction.
Sometimes you may notice that a building is producing more materials than you can make use of at a given time. An example of this is the forester's hut. The forester plants saplings so quickly that a forest of incredible size can develop blocking potentially important building sites.
If you don't want to tear the building down, there's a less radical alternative which allows you to stop production temporarily. Select the building and then the building menu will appear on your left. There in the upper left you'll see the button with the interlocking gears. When you click on this button, the production in this building will be suspended and the button's interlocking gears will be replaced with an open hand.
To resume production, reselect the building and click on the button with the open hand.
 You'll notice that some of the Settlers do not work within their
buildings, but outside under open skies. You can set the center of their work activity by
first selecting the building and then selecting the button with concentric colored circles
in the upper middle of the menu.
You'll notice that some of the Settlers do not work within their
buildings, but outside under open skies. You can set the center of their work activity by
first selecting the building and then selecting the button with concentric colored circles
in the upper middle of the menu.
After clicking on this button, you'll see another group of concentric circles appear in the playing area. These indicate where the forester's activity is presently focused. By clicking on a new area in the playing area, you can move the center of the forester's activity to this position. Be careful neither to click on an object or in a location too far away.
 When you
click on a location within acceptable distance of the forester's hut, you'll see that the
concentric rings now have as their center the position you've just chosen. With a right
click the circles will disappear.
When you
click on a location within acceptable distance of the forester's hut, you'll see that the
concentric rings now have as their center the position you've just chosen. With a right
click the circles will disappear.
You can change this setting as often as you see fit during
the game.
Crushing an existing building is no different than crushing
a construction site. You'll recover half of the building material that you originally used
for its construction. The Settler from the crushed building, along with his tool, can be
put to service elsewhere.
Stationing
Soldiers in Buildings
![]()
To station soldiers in a military building, you first have to mark the building. Again the building menu appears on the left giving you the opportunity to assign soldiers to the building.
In the lower left of the menu you'll find two symbols of castles with arrows. The uppermost of the two (the one with the thicker arrow) ensures that the building is fully manned.
The lower button with the small arrow ensures that this building is only minimally manned. Minimal manning means there is only one swordsman.
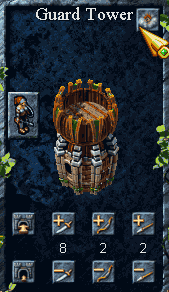
The Different Types of Weapons
in Military Buildings
![]()
 You can determine what special mix of troops you want your military
building to have. You can adjust this by using the six arrow keys to the right of the two
castle buttons. With these buttons you can determine how many swordsmen, spearmen or
bowmen man occupy the buildings. There are limits, however, on the number of units each
building can hold. For maximum capacity click on the "Fill building" button.
You can determine what special mix of troops you want your military
building to have. You can adjust this by using the six arrow keys to the right of the two
castle buttons. With these buttons you can determine how many swordsmen, spearmen or
bowmen man occupy the buildings. There are limits, however, on the number of units each
building can hold. For maximum capacity click on the "Fill building" button.
If you want to reduce the number of soldiers for a particular building, you need only click on the button with the arrow pointing downward for whichever type of soldier you want to remove. The buttons with the arrows pointing upward add the corresponding type of soldiers, if available.
 Crushing military buildings is the same as crushing other buildings.
Half of the building material used in the building's construction becomes available to you
again. The soldiers stationed in these buildings become available once again.
Crushing military buildings is the same as crushing other buildings.
Half of the building material used in the building's construction becomes available to you
again. The soldiers stationed in these buildings become available once again.