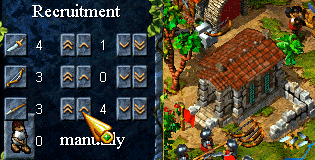
 A soldier becomes available, just like a
craftsman, when three conditions are met: there has to be at least one unemployed Settler,
there must be a weapon available for this Settler and there must be a barracks in which
the soldier can be recruited.
A soldier becomes available, just like a
craftsman, when three conditions are met: there has to be at least one unemployed Settler,
there must be a weapon available for this Settler and there must be a barracks in which
the soldier can be recruited.
In addition, you have to set the command “Recruit Automatically” in the menu “Recruiting Soldiers”. If you have this setting on “Manual”, you have to recruit soldiers yourself. You will learn how to do this in the section “Menus in the Game”.
A large army of soldiers requires, therefore, several residences, one, or even better two weapon smith's works as well as a barracks. As a rule, one barracks should be enough unless it happens to be located in a relatively menacing area and can not easily be defended. In this case, a second barracks would ensure that you have a fresh supply of troops that could be recruited if the first barracks were destroyed by your enemy.
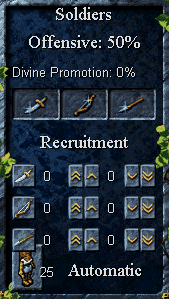 In the "Military" menu (in the
"Settlers" menu) you’ll find three buttons displaying the three types of
soldiers: swordsmen, bowmen and spearmen. With these buttons you can promote one type of
these soldiers at a time. To promote soldiers, however, you need manna. Manna is only
available after you’ve built a small temple and have offered your god his favorite
alcoholic drink. Only then will your soldiers be promoted. In addition, every promotion
requires more manna than the one before. In order to promote all your soldiers to high
ranks, you’re going to have to offer your god plenty to drink.
In the "Military" menu (in the
"Settlers" menu) you’ll find three buttons displaying the three types of
soldiers: swordsmen, bowmen and spearmen. With these buttons you can promote one type of
these soldiers at a time. To promote soldiers, however, you need manna. Manna is only
available after you’ve built a small temple and have offered your god his favorite
alcoholic drink. Only then will your soldiers be promoted. In addition, every promotion
requires more manna than the one before. In order to promote all your soldiers to high
ranks, you’re going to have to offer your god plenty to drink.
Click on the button of the type of soldier you want to
promote. The "divine strengthening" display will show you how much time remains
until the promotion process is complete. When the display reaches 100%, you can then press
one of the buttons. The type of soldier that you’ve chosen will be promoted —
but only those recruited from this time on. The soldiers you already have will remain at
their current rank.
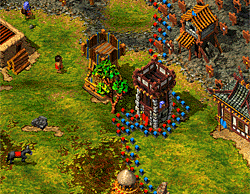
Marking
Soldiers and Moving Them
![]()
You can select or mark one or more soldiers by clicking on him or them with the left mouse button. By clicking with your left mouse button and holding it depressed, you can move the mouse in the playing area, creating a rectangle large enough to enclose a group of soldiers that you wish to select.
To move the soldier(s) selected, you have to mark them with the left mouse button, and then click on the location in the playing area where you want them to go with the right mouse button.
Adding
Soldiers to Existing Groups
![]()
Keyboard command: Mark soldier/group + SHIFT
After you've selected a group of soldiers, you can add more soldiers to this group by selecting the soldiers to be added with the SHIFT key depressed.
Selecting
Soldiers of only one Type
![]()
Keyboard command: Mark soldier + ALT
If you want to select from a larger group of soldiers only those of a particular type (spearmen, for example), mark only one single soldier of this type while holding the ALT key depressed. When you click on a spearman, all spearmen in a wider radius will be selected.
Assigning
Soldiers to Designated Groups
![]()
Keyboard command: Mark group and then ALT + Number (1-9)
You can assemble any number of soldiers into a special unit by selecting all the soldiers you want to belong to this unit and then simultaneously pressing the ALT key and a number from 1-9.
Selecting
Designated Groups and Centering the Playing Area on Them
![]()
Keyboard command: Select: Type group number (1-9)
Keyboard command: Center playing area: Type group number twice.
The units defined in "Assigning Soldiers to Designated Groups" can be selected and directed by typing the corresponding number once. Typing the same number again will center the playing area on the designated group you have selected. This naturally increases the flexibility and precision with which you can lead your battles.
Keyboard command: Move soldier/group + CTRL
When you issue a normal "Move" command, it is possible that the soldier or group is diverted by enemy soldiers. If you want to prevent this diversion, perhaps because you want your soldiers to retreat, you can issue the "Move" command by simultaneously depressing the right mouse button and the CTRL-key. In this way your soldiers will ignore all diversions and move to the destination you have chosen.
Keyboard command: Issue up to four "Move" commands soldier/group + SHIFT
In addition to your final destination, you can set several waypoints, which your soldiers will go to on their way to their final destination. You can set these waypoints (a maximum of three plus the final destination) by clicking with the right mouse button with the SHIFT-key constantly depressed on the spots in the playing area where you want your soldiers to go in the desired sequence.
Keyboard command: Issue "Move" command soldier/group + ALT
Patrols are a good means for hindering thieves. Form a small group of soldiers. Click with the right mouse button with the ALT key depressed simultaneously on the desired "turn around" point of the patrol in the playing area. The group you have formed into a patrol will then move between its starting point and the new turn around point.
All "Move" commands can be cancelled by issuing any other "Move" command.
You can move the different instruments of war the same way you move soldiers, thieves and geologists. Select the ballista, catapult, cannon or war gong and then right-click on the spot where you want the instrument of war to go. Keep in mind that these instruments of war are rather large and can't make their way through forests, fields of stones or cross mountains. You can, of course, make use of waypoints to circumvent unfavorable terrain.
The Different Kinds of Troops and
their Functions
![]()
![]() The swordsman is always on the very front lines of
battle. His advantage is his weapon, which is very effective and inflicts severe injury to
his enemy. The swordsman is your strongest attacking figure. His disadvantage is that he
is always right up there in the thick of battle which tends to keep life expectancy short
unless he is regularly sent to the healer.
The swordsman is always on the very front lines of
battle. His advantage is his weapon, which is very effective and inflicts severe injury to
his enemy. The swordsman is your strongest attacking figure. His disadvantage is that he
is always right up there in the thick of battle which tends to keep life expectancy short
unless he is regularly sent to the healer.
![]() With his spear, the spearman is able to keep his
enemy at a little distance. His spear, however, inflicts less injury than a sword. The
advantage of the spearman lies clearly in defense. He can let the enemy swordsmen advance,
knowing that before they get within striking distance, they will have felt the tip of his
lance more than once.
With his spear, the spearman is able to keep his
enemy at a little distance. His spear, however, inflicts less injury than a sword. The
advantage of the spearman lies clearly in defense. He can let the enemy swordsmen advance,
knowing that before they get within striking distance, they will have felt the tip of his
lance more than once.
![]() The bowman distinguishes himself at the rear where
he can unleash a flurry of deadly arrows upon your foes. This is very effective as long as
your swordsmen can keep your enemy at a distance. If your front collapses, though, you are
well advised to persuade your bowmen to beat a hasty retreat because in close combat, they
are at a hopeless disadvantage.
The bowman distinguishes himself at the rear where
he can unleash a flurry of deadly arrows upon your foes. This is very effective as long as
your swordsmen can keep your enemy at a distance. If your front collapses, though, you are
well advised to persuade your bowmen to beat a hasty retreat because in close combat, they
are at a hopeless disadvantage.
How important surveillance and reconnaissance are, will be explained in greater detail in the section "Strategy and Tactics". The thief is the one who will give you decisive tips on where your apparently invincible foes have their Achilles' heels. And you can be sure that they have at least one...
Of course, your thieves are also quite useful in helping themselves to enemy goods. The gold, for example, that they pilfer weakens the fighting strength of your foe while strengthening it for your soldiers. Be careful with your thieves when enemy soldiers are near because they can't sustain much injury.
The healer gets your wounded soldiers back up on their feet and saves you the expense of a replacement soldier. Wounded soldiers should be withdrawn from battle when their status display turns red. Simply select all the soldiers in the area and press your TAB key - the healthy soldiers will no longer be marked, only your wounded ones. You can then send them to the healer together.
To carry out most acts of divine intervention, the priests have to be in the area where the wonder is to take place. As a rule, your priests are, therefore, in a danger when they do this. For this reason you might want to provide your priests with an adequate escort of soldiers. The priests of each race have eight different acts of divine intervention at their disposal. Each of these acts also has its price.
Jupiter's Acts of Divine Intervention
![]()
![]() The fog of war is lifted for an area somewhat
larger than the area that a thief makes visible. You can then see what's going on in this
area. This is one of two interventions for which the priest doesn't have to be in the
immediate vicinity.
The fog of war is lifted for an area somewhat
larger than the area that a thief makes visible. You can then see what's going on in this
area. This is one of two interventions for which the priest doesn't have to be in the
immediate vicinity.
![]() A thunderstorm sent by
Jupiter transforms the desert into grassland which you can then build on and colonize -
provided that this area is within your territory.
A thunderstorm sent by
Jupiter transforms the desert into grassland which you can then build on and colonize -
provided that this area is within your territory.
![]() Grain, rice or winegrapes
grow much more quickly making an earlier harvest possible.
Grain, rice or winegrapes
grow much more quickly making an earlier harvest possible.
![]() Jupiter can put the fear of
a god into your foes when they attack your homeland. For a short period your enemy's
attacks only cause half of their normal damage.
Jupiter can put the fear of
a god into your foes when they attack your homeland. For a short period your enemy's
attacks only cause half of their normal damage.
![]() An assortment of gifts rain
down upon you from the heavens. Your reward is always a little different, but you can be
sure it will be beneficial.
An assortment of gifts rain
down upon you from the heavens. Your reward is always a little different, but you can be
sure it will be beneficial.
![]() Jupiter can transform iron
into gold. For this he needs some help from his brother Neptune. Neptune often needs iron
for his trident which corrodes quickly because of the salty sea. Therefore he is willing
to exchange gold for iron.
Jupiter can transform iron
into gold. For this he needs some help from his brother Neptune. Neptune often needs iron
for his trident which corrodes quickly because of the salty sea. Therefore he is willing
to exchange gold for iron.
![]() If your opponent has too
many mineral resources, you might want to even the score with this divine intervention.
Your priest casts a curse on the mines of your opponent. This causes the mine to only
produce half the original resources it once had.
If your opponent has too
many mineral resources, you might want to even the score with this divine intervention.
Your priest casts a curse on the mines of your opponent. This causes the mine to only
produce half the original resources it once had.
![]() As a Roman your status as a
citizen of the civilized antique world is often a source of jealousy for your opponent.
The next time you're confronted with the hordes of unwashed barbarians - whether they are
Egyptians, Asians or Amazons - simply convert them. Your priest is well trained in this
spell.
As a Roman your status as a
citizen of the civilized antique world is often a source of jealousy for your opponent.
The next time you're confronted with the hordes of unwashed barbarians - whether they are
Egyptians, Asians or Amazons - simply convert them. Your priest is well trained in this
spell.
Horus' Acts of Divine Intervention
![]()
![]() Horus, the Egyptian sun
god, will naturally have no problems turning fertile grassland into desert. This act of
divine intervention is most effective right before your opponent (non-Egyptian) reaps an
ample harvest.
Horus, the Egyptian sun
god, will naturally have no problems turning fertile grassland into desert. This act of
divine intervention is most effective right before your opponent (non-Egyptian) reaps an
ample harvest.
![]() Horus uses a similar
technique to convert swamp into fertile grassland. It would be a shame to waste this one
on your opponents unless, of course, you want to sabotage the rice harvest of your Asian
opponent.
Horus uses a similar
technique to convert swamp into fertile grassland. It would be a shame to waste this one
on your opponents unless, of course, you want to sabotage the rice harvest of your Asian
opponent.
![]() Horus and Ch'ih-Yu have a
deal where Horus gets the meat left from Ch'ih-Yu's banquets in return for fish. What
Ch'ih-Yu does with the fish, Horus doesn't know or care. Horus gives the meat to his
Settlers so that they can feed their iron workers.
Horus and Ch'ih-Yu have a
deal where Horus gets the meat left from Ch'ih-Yu's banquets in return for fish. What
Ch'ih-Yu does with the fish, Horus doesn't know or care. Horus gives the meat to his
Settlers so that they can feed their iron workers.
![]()
 If you think your Asian opponents have just a little too much wood,
then you might implore Horus for some help. This act of divine intervention is especially
effective in thickly wooded areas where the fire can spread easily. If your opponent isn't
able to erect a fire wall, he might experience some nasty shortages of building material.
If you think your Asian opponents have just a little too much wood,
then you might implore Horus for some help. This act of divine intervention is especially
effective in thickly wooded areas where the fire can spread easily. If your opponent isn't
able to erect a fire wall, he might experience some nasty shortages of building material.
![]()
Horus also knows how to shower his loyal and generous Settlers with gifts. Whatever seems to be needed, falls into the Egyptians' laps.
![]() Horus is the sun, and the
sun shines everywhere. Because your god is ever present, even on the most distant
battlefield, your priests can double the fighting strength of your soldiers for a short
period. Their attacks are then twice as destructive.
Horus is the sun, and the
sun shines everywhere. Because your god is ever present, even on the most distant
battlefield, your priests can double the fighting strength of your soldiers for a short
period. Their attacks are then twice as destructive.
![]() For your priests this may
be a kamikaze mission but possibly the salvation of your army in its hour of need. All
enemy soldiers who are in the vicinity of this act of divine intervention are magically
transported away on Horus' wings to the place you've chosen.
For your priests this may
be a kamikaze mission but possibly the salvation of your army in its hour of need. All
enemy soldiers who are in the vicinity of this act of divine intervention are magically
transported away on Horus' wings to the place you've chosen.
![]() Enemy bowmen can quickly
inflict great losses to your military. Horus is pleased to help you by transforming the
enemy bowmen into pioneers.
Enemy bowmen can quickly
inflict great losses to your military. Horus is pleased to help you by transforming the
enemy bowmen into pioneers.
Ch'ih-Yu's Acts of Divine Intervention
![]()
![]() With Ch'ih-Yu's breath of fire, this is a simple
exercise. If an area of snow is an obstacle for you, either impeding transportation or
making mineral resources inaccessible, let Ch'ih-Yu melt the snow away.
With Ch'ih-Yu's breath of fire, this is a simple
exercise. If an area of snow is an obstacle for you, either impeding transportation or
making mineral resources inaccessible, let Ch'ih-Yu melt the snow away.
![]() Building is not possible in a field of stones and
instruments of war cannot cross a field of stones. Asians opponents are doubly hard hit by
this curse because it takes a long time to clear the stone and when it has been cleared,
they hardly have any use for it. Let the dragon god hurl a pile of stones where you want.
He will enjoy himself. And you will, too.
Building is not possible in a field of stones and
instruments of war cannot cross a field of stones. Asians opponents are doubly hard hit by
this curse because it takes a long time to clear the stone and when it has been cleared,
they hardly have any use for it. Let the dragon god hurl a pile of stones where you want.
He will enjoy himself. And you will, too.
![]() Ch'ih-Yu and Horus have a deal. Ch'ih-Yu gets the
fish left from Horus' banquets in return for meat. What Horus does with the meat, Ch'ih-Yu
doesn't know or care. Ch'ih-Yu gives the fish to his Asian fisherman to improve their
catch.
Ch'ih-Yu and Horus have a deal. Ch'ih-Yu gets the
fish left from Horus' banquets in return for meat. What Horus does with the meat, Ch'ih-Yu
doesn't know or care. Ch'ih-Yu gives the fish to his Asian fisherman to improve their
catch.
![]() Ch'ih-Yu, like the other gods knows what his Asian
Settlers can use in times of need. What pours down from the skies may vary from time to
time, but it's always something useful.
Ch'ih-Yu, like the other gods knows what his Asian
Settlers can use in times of need. What pours down from the skies may vary from time to
time, but it's always something useful.
![]() In Asia, there are millions of spirits and divine
entities. One of these is certainly ready to do Ch'ih-Yu a favor by transforming stone
into iron.
In Asia, there are millions of spirits and divine
entities. One of these is certainly ready to do Ch'ih-Yu a favor by transforming stone
into iron.
![]() The invulnerability of Ch'ih-Yu's dragon skin can
be partially transmitted by Asians priests to soldiers. In this act of divine intervention
all soldiers in the vicinity experience a 30% increase in their ability to protect
themselves.
The invulnerability of Ch'ih-Yu's dragon skin can
be partially transmitted by Asians priests to soldiers. In this act of divine intervention
all soldiers in the vicinity experience a 30% increase in their ability to protect
themselves.
![]() Transform your soldiers into attacking whirlwinds.
For a short period your soldiers attack at twice their normal speed.
Transform your soldiers into attacking whirlwinds.
For a short period your soldiers attack at twice their normal speed.
![]() Your own troops are far away and one of your
towers is under attack? Implore Ch'ih-Yu to transport your distant troops to the
endangered area. Transporting so many heavily armed soldiers is strenuous for Ch'ih-Yu and
his price for this act of divine intervention is correspondingly high. This is the second
intervention that works at a distance. The transported soldiers land in the immediate
vicinity of the priest. Be sure that your priest is near the endangered area before using
this one.
Your own troops are far away and one of your
towers is under attack? Implore Ch'ih-Yu to transport your distant troops to the
endangered area. Transporting so many heavily armed soldiers is strenuous for Ch'ih-Yu and
his price for this act of divine intervention is correspondingly high. This is the second
intervention that works at a distance. The transported soldiers land in the immediate
vicinity of the priest. Be sure that your priest is near the endangered area before using
this one.
Q'nqüra's Acts of Divine Intervention
![]()
![]() For a short period you can see the
entire map. This miracle is especially practical for making most effective use of your
soldiers and thieves.
For a short period you can see the
entire map. This miracle is especially practical for making most effective use of your
soldiers and thieves.
![]() This wonder conjures up a forest of saplings.
This can be a blessing for wood production or a curse for the enemy Egyptians, who will
lose valuable building space and can't make so much use of wood.
This wonder conjures up a forest of saplings.
This can be a blessing for wood production or a curse for the enemy Egyptians, who will
lose valuable building space and can't make so much use of wood.
![]() Your priestess can have goods from distant areas
brought to her vicinity.
Your priestess can have goods from distant areas
brought to her vicinity.
![]() Your priestess can just as easily have goods in
her vicinity transported off to whatever location you want.
Your priestess can just as easily have goods in
her vicinity transported off to whatever location you want.
![]() An assortment of gifts rain down upon you from
the heavens. Your reward is always a little different, but you can be sure it will be
beneficial.
An assortment of gifts rain down upon you from
the heavens. Your reward is always a little different, but you can be sure it will be
beneficial.
![]() This miracle causes gold to be converted into
stone. This would be a high price to pay for building materials but has a great deal of
merit for horrifying your foes.
This miracle causes gold to be converted into
stone. This would be a high price to pay for building materials but has a great deal of
merit for horrifying your foes.
![]() For a certain amount of time enemy soldiers are
frozen. In this condition they aren't able to defend themselves when they are attacked.
Don't feel guilty about using this one. Your enemy wouldn't, would he?
For a certain amount of time enemy soldiers are
frozen. In this condition they aren't able to defend themselves when they are attacked.
Don't feel guilty about using this one. Your enemy wouldn't, would he?
![]() With this miracle, your priestesses can ward off
any injury to your troops from enemy bowmen for a certain amount of time.
With this miracle, your priestesses can ward off
any injury to your troops from enemy bowmen for a certain amount of time.
The small guard tower is the building that you have at the very beginning of the game. With this building you expand your territory and during the course of the game, the guard tower will probably be the building that you most frequently build.
You should consider using your available building materials for the construction of a big guard tower where you have the room, but especially in the vicinity of large mountains or deserts. The area that it opens up for your colony is considerably larger than its smaller counterpart. Near mountains, this means substantially more mineral resources that you can exploit, and near deserts, this means encompassing areas that a small guard tower would not cover.
The pioneer offers yet another possibility for expanding your territory . He can be sent to any area of map with the same move commands that are used for soldiers, thieves, and geologists. When he arrives at the location you've chosen, he begins sinking posts which mark the new territory that he's bringing under your control. He can perform his work in all territory that is not currently under enemy control.
Everywhere that your infrastructure is endangered by an attack, you should position one or even several castles. Castles are the military buildings which hold the most soldiers and can withstand a serious enemy attack the longest. If you have troops in reserve elsewhere, you could have just enough time to get them into battle as reinforcements.
You can, of course, also expand your territory with a castle.
The lookout tower is a good choice when you have no thieves at hand or when your neighbor's borders are really strongly guarded. With this building the amount of distance you can view into enemy territory is increased significantly. If you share no borders with foes, the lookout tower is of small use since you can just as easily send out soldiers, geologists and thieves.
There is an exception to this rule: You can use the lookout tower to good effect for viewing terrain over bodies of water that would otherwise take too long for your foot soldiers to reach. It is also important to note that the lookout tower, unlike the guard towers, does not garrison soldiers or expand territory.
The significance of the barracks has already been addressed on several occasions: without barracks you have no soldiers.
In the catapult hall the Romans build war machines that could make David drool and Goliath think twice before entering into a fray. During a battle or siege the catapult can deliver very satisfactory results even at greater distances. You might wish, though, that the accuracy was a bit better.
The Egyptians use the ballista, a kind of gigantic crossbow, for terrifying enemies at more than arm's length. The ballista is more accurate than the catapult and less destructive than the cannon.
The Asians are a bit more advanced and have cannons, which offer considerably more destructive capacity than the antique weapons of their foes. But manufacturing them is also more complicated and they function only when you have a sufficient supply of gunpowder.
In order to produce gunpowder, the Asians need coal and sulfur from the corresponding mines and of course a gunpowder maker, who prepares the explosive mixture in his quarters.
The Amazons produce their effective war gongs here. This menacing instrument of war devastates buildings with a single bang.
The core of your strategic considerations should always be to inflict a maximum of damage on your foes and to sustain minimum losses yourself. Because THE SETTLERS III is not only a strategy game, but primarily a game which focuses on building up an economy, you'll discover far more strategic avenues to pursue than in other strategy games that are limited to purely military operations. The equilibrium of a colony depends on a number of factors and, often enough, disturbing just one of these can bring an entire colony to its knees.
Let’s lay the cards on the table: whether you play a campaign, or in the Internet, or in a LAN, peaceful co-existence will only be preserved temporarily. That is, as long as it's to the advantage of all the players. It's entirely possible to agree with friends from the very beginning, not to fight each other. And it’s possible that they'll all stick to the agreement. But this will probably be more the exception than the rule.
In this type of game, you really won’t need any tips on military strategy. You only have to recruit enough soldiers to man your guard towers. And perhaps a couple more in reserve, so that you don’t lead your fellow players into too big a temptation...
Not quite
so Peaceful Co-existence
![]()
In this game it's not possible to recruit a couple soldiers at the very beginning of the game and then march out to obliterate your enemy in a blitzkrieg. Whoever manages to get an efficient infrastructure built up quickly, has the advantage here. You can read about this in the chapter on the economy.
It takes some time before you can recruit additional soldiers and outside your borders, your soldiers are disgustingly weak. At least until you have amassed a reasonable supply of gold.
Just because you aren’t active and not able to attack your foe at the beginning doesn’t mean that you don’t have any strategic decisions to make. The protection of your infrastructure is far more important than offensive troops.
Even the biggest army won’t be of much help when important chains of supply in your infrastructure are unprotected. In the chapter on the economy it becomes clear what factors are of importance: short transportation distances and wise use of land and resources. The more densely your production centers have been positioned, the fewer guard towers you need to protect them. Keep in mind that when one of your guard towers which secures:
![]() the
territory for your mines
the
territory for your mines
![]() the territory for your food industry
the territory for your food industry
![]() the territory for your metal processing
industry
the territory for your metal processing
industry
![]() the territory for the production of
building materials
the territory for the production of
building materials
![]() or important transportation routes
between these centers,
or important transportation routes
between these centers,
is taken over in battle, your entire infrastructure can quickly collapse. Therefore, you should keep a close eye on your infrastructure, recognize the most important zones and protect these especially well against enemy attack. There you can build large guard towers or even castles when you have enough room. Station as many soldiers as possible in these buildings. And it certainly doesn’t hurt to position additional soldiers outside these guard towers.
 It could well depend on just one of these
buildings whether your infrastructure continues to function or not. Remember that when one
of your guard towers is conquered, all the other buildings within the territory secured by
this guard tower (or castle) are destroyed. Even if you succeed in reconquering this land,
it'll
take you some time to rebuild all the buildings that were previously there. This is a
point at which your enemy can use to continue his production undisturbed.
It could well depend on just one of these
buildings whether your infrastructure continues to function or not. Remember that when one
of your guard towers is conquered, all the other buildings within the territory secured by
this guard tower (or castle) are destroyed. Even if you succeed in reconquering this land,
it'll
take you some time to rebuild all the buildings that were previously there. This is a
point at which your enemy can use to continue his production undisturbed.
But how can your foe be aware of the weak points in your colony? Quite simply, he's probably made use of a thief. That’s an excellent reason for setting up a network of border guards who make it difficult for a thief to penetrate your colony without his cover being blown. Moreover, you can have your soldiers patrol sections of your border. The section dealing with keyboard commands explains how to do this easily and efficiently. It's important to discover thieves before they penetrate deep into your colony, revealing sensitive information to your foes. If you find out that, despite all your precautions, a thief has made the infrastructure of your colony transparent, you should immediately deal with any weak points you may have and possibly even consider restructuring your colony.
Naturally, it doesn’t help much to wall yourself in on a long-term basis. This won't weaken your opponent. Let’s assume then that you have your infrastructure under control. You have expanded your colony as much as this is possible and reasonable. You have also built up a sensible system of defensive measures, with all your important production centers well protected. What now?
The First
Step: Reconnaissance
![]()
Have you gathered a little information about your foe? Do you know where an attack would really inflict some damage? If not, you should send a thief out to check out your enemy. If your enemy, however, has taken the defensive tips listed above to heart, then his borders will be as well guarded as yours and your thief will have little opportunity to sneak through. Perhaps a little diversion might help.
Put together three to five smaller troops, each strong enough to initiate a serious attack on a guard tower. Simultaneously attack several points along your foe’s border with these troops. These attacks will probably not be very successful, but could get your enemy's border guards to leave their posts to repel your attack. Then one or more of your thieves would have the opportunity to cross the border unnoticed. Once they successfully infiltrate enemy terrain, they only have to avoid enemy patrols and find the best locations for a pinpoint attack. This kind of focused attack can cause substantially more damage than a massive blow against the peripheral areas of your enemy. Who is interested in destroying the third, fourth, fifth, sixth or even seventh pig farm? But when the enemy's only barracks and a key grain mill can be eliminated, that hurts.
You should be very careful that your thief is not detected because if this happens, your foe is aware that you have outsmarted him.
The
Second Step: Pinpoint Attacks
![]()
Provided that your opponent doesn’t have a much smaller army, obvious weaknesses in his infrastructure or anything similar (information your thief can provide you with), but is about equally well developed, your task is to weaken him. And this is less a matter of decimating his soldiers than causing him serious problems in his chain of supply. After all, the entire complex infrastructure of the Settlers is not in place merely for their delight, but rather for the organization of a chain of supply.
In the Chapter "The Protection of your Colony" the sensitive points which you offer your opponent have already been drawn to your attention. Your foe, of course, has the same sensitive points. It is most likely nearly impossible to build up a colony completely free of one Achilles’s heel or more. The mixture of terrain alone makes it difficult for him to be able to construct a building where he would like to, and now and again, there is simply no more room. And perhaps, where he has exploited the last bit of his land, he has neglected to build an appropriately strong tower or castle, manned with an adequate number of soldiers.
- Perhaps he has overlooked that you only need to take over two small guard towers to disrupt the transport of goods from the weapon smith to the barracks.
- Perhaps he has overlooked that his mines for the most part lie perilously near his borders and are only protected by one guard tower.
- How well are the iron smelter’s works and weapon smith’s works protected?
- The grain mill, the bakery, the slaughterhouse. These are all buildings which are often only built singly. Where are the bottlenecks in your foe’s infrastructure? How difficult would it be to reach this area? Is there a strong troop presence there? Could a feigned attack somewhere nearby serve as a diversionary tactic?
- The combat strength of your enemy’s soldiers depends on how many bars of gold he has stored up. Is there a storage area filled with gold that is perhaps inadequately defended? If you conquer this area, it could have a devastating effect on the fighting strength of your enemy outside his borders. This could possibly prevent him from paying your colony an unwanted visit.
- The number of Settlers that your opponent can recruit depends not only on the number of Settlers. There must be residences for these Settlers. All those Settlers who have not yet been assigned an occupation or recruited into the army are paralyzed when their residence is destroyed and thus rendered useless. If you manage to destroy a middle-sized residence, he will have to first build a series of residences before he can again recruit soldiers.
By now, you've surely recognized the kinds of things to be taken into consideration. You'll come up with a lot of ideas yourself and with a little practice you'll become increasingly proficient in "reading" the infrastructure of your enemy and quickly recognizing his weak points. Your goal is in any case clear: an opponent who is as strong as you or stronger has to be weakened because an open battle against him can have at best a very uncertain outcome. And such a battle is much more fun when you have also won it.
It's advisable to initiate the decisive battle only when you're fairly sure that you can win it. If this is case, that is, you have at least a moderate numerical superiority, some tips follow in the section "The Stronger Position". If, on the contrary, you 're being attacked and the enemy is approaching with a legion of troops which clearly exceeds the size of your army, some tips (and a heartfelt "Good Luck!") follow in the section "The Weaker Position".
In the stronger position you should, above all else, proceed prudently. Take advantage of the room at your disposal. Beyond this, the simplest rules of strategy apply.
- Don't let your opponent lure you into a narrow enclosure where a small number of his troops can hold you up and where you could be exposed to a continuous bombardment of his bowmen's arrows.
- Try to surround your foe. The broader the front, the more you can bring your superiority to bear.
- Try to get some of your troops behind your opponent so that you can attack him from behind, where his bowmen are for the most part without protection and can be quickly eliminated.
- Use your superiority to quickly deal the decisive death blow to the infrastructure. Take over everything which offers only moderate resistance. Then, if your military strength still allows, you can proceed with the coup de grace. If your foe’s resources are gradually diminishing, you may want to let him stew a bit longer amid the remnants of his empire. Your infrastructure is still functioning! You won't have to wait long for the war of attrition to take its toll.
To make it clear from the very beginning, if your opponent hasn't made any serious mistakes, your position won’t be an easy one, but everyone can make mistakes, and some mistakes can be provoked. The following are a couple diversionary tactics that you might find useful.
- Be bold. Gather together half of your available troops and move them toward your enemy's colony. Possibly he's left parts of his colony vulnerable while preparing his attack. If you manage to attack some of his most important production centers, he'll probably be so diverted that your home front will only be facing a leaderless mass of foes. With no leader, even superior numbers can be vanquished. You should, at least, be able to avert the complete destruction of your colony since you'll be conquering enemy territory. With the damage that your enemy has to sustain, it could take a long time before he can prepare a new assault.
- If you have a thick forest nearby which is favorably located, you could try dividing your troops and concealing half of them there. With a little luck, you might be able to attack your enemy's bowmen from the rear and eliminate a major part of the menace. Without the support of bowmen, any army is considerably weakened.
- Try to lure the enemy army into an area where you have one or more castles so that your bowmen can be used to maximum effect. In the castle towers, they are at a distinct advantage as long as you are able to hold castle.
- In narrow, enclosed terrain, you have the advantage of more targets for your bowmen than your opponent. Make use of this where possible!
Once again it must be said you're not confronted with an envious situation. Against an experienced opponent the game will probably soon be over. However anyone who doesn't clench his teeth, roll up his sleeves and do whatever else that might help, has lost from the very beginning. Even if you do go down in a blaze of glory, next time you can take care not to get into this situation again. Another look at chapter on the "Economy" could also help. Good Luck!